Bonus - Skeletal Animation

Images courtesy cgi.tutsplus.com which illustrates and explains character rigging for linear blend skinning.
Objectives:
Understand the formulation of skeletal animation with linear blend skinning
Understand how kinematic bones control each vertex through a set of dedicated weights
Implement some key aspects of the skinning in a vertex shader
Pre-requisites:
Practical 6 - Keyframe Animation must be finished as we rely on Node keyframing for bone animation
Principle
As described during the lecture, linear blend skinning is a simple and efficient technique to model non-rigid deformation as a mixture of rigid components. A set of rigid bones govern this deformation, each associated with a single animated rigid transformation, and every vertex of the skinned model is given a set of weights for each bone’s contribution. If we note \(\mathrm{T}_b\) the transform of each bone of index \(b\), and \(w_{b,i}\) the weight given to of each bone \(b\) for transforming vertex \(i\), \(\mathbf{v}_i^m\) the model position of vertex \(i\), then the world position \(\mathbf{v}_i^w\) of vertex \(i\) is given by the following expression:
The constraint on the weights expresses that their sum for a given vertex is normalized to one. An intuition of this is that the deformed point is at the barycentric coordinates \(w_{b,i}\) of each version of its per-bone transformation \(\mathrm{T}_b \cdot \mathbf{v}_i^m\).
Code base
We give a tutorial code where most CPU aspects of setting up a shader toward linear blend skinning have been taken care of:
viewer.py
skinning.vert
color.frag
core.py
transform.py
animation.py
Make sure you completed animation.py from Practical 6, as well as
your completed node.py from Practical 3.
The main code dedicated to skinning is contained in the skinning.vert
shader code, and the associated Skinned mesh decorator class at the
end of the animation.py file.
The Skinned decorator class is where the skeletal animation-specific attributes
attributes are added to a constructed mesh object and to its draw commands.
Take a while to examine the details of this code.
The code contains a first example of use of the Skinned decorator.
It creates a skinned cylinder SkinnedCylinder, which consists of two
bones (materialized by two KeyFrameControlNode instances,
itself and a child Skinning Node), their keyframes and the cylinder geometry.
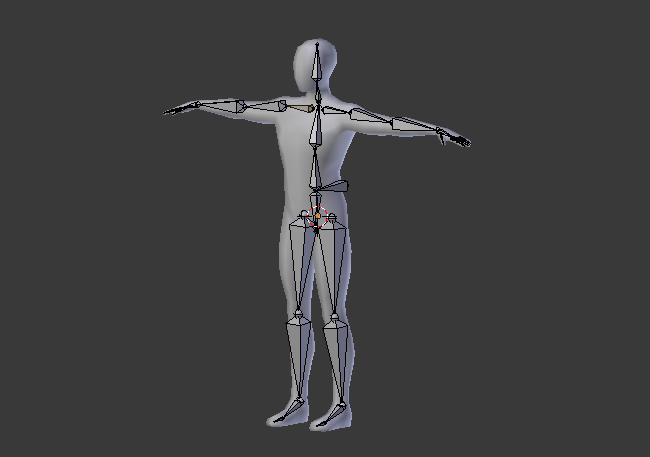
Note that there can be many bones for an animation (as illustrated with the above human skeleton), but for any given vertex of the animated mesh, the number of actual bones contributing to its displacement is usually low. It very rarely exceeds four bones, meaning usually less than four of the \(w_{b,i}\) weights are non-zero. For our cylinder animation for example, only two bones are used, such that there are by construction at most two non-zero weights per vertex here.
This usually leads to a shader implementation where two vec4 attributes
are passed per vertex, one containing these four or less non-zero weights
(bone_weights in the code), and the second which passes the index of the
corresponding contributing bones (bone_id in the code, we pass it here as
float for simplicity, which means you’ll have to convert them back to int
in the shader). These indices allow to access the bones transform in a uniform
table bone_matrix which is filled with each bone’s model-to-world coordinate
transform at every new draw call.
Exercise 1: Skinning shader
When you run viewer.py you see the cylinder colored with the weight array.
The weights are basically assigned a binary value weight for each half of the
cylinder, dividing it in two bones.
Currently the vertex shader just copies the initial model coordinate of the vertex so nothing moves.
Code the expression of the skinning matrix according to the skinning expression given above to see the Cylinder fold. You can restart the animation with the SPACE key, and toggle visualizing a wireframe version of the mesh with key W to examine how each vertex moves.
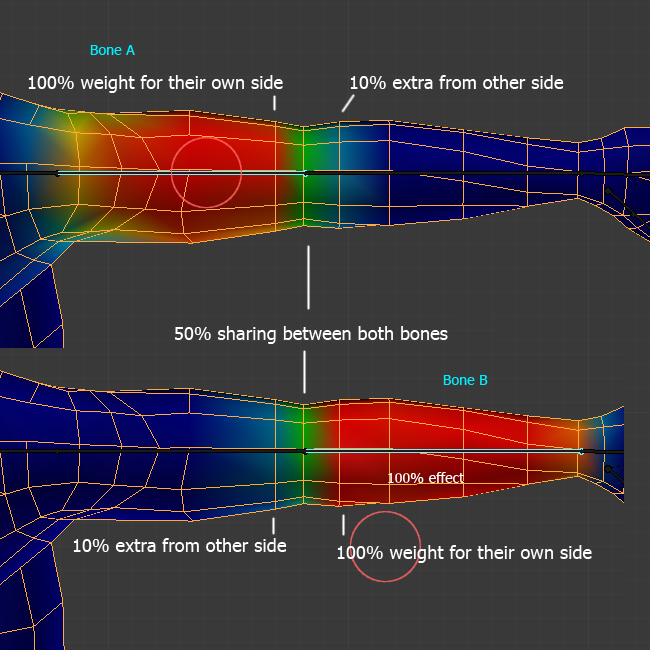
Exercise 2: Smooth bone contribution
With the binary weights given, we have basically reproduced the behaviour of the robot arm of Practical 6, only now within one mesh object and its bones. This would not be very realistic for a human arm for example, where there is some non rigid deformation of human skin at the elbow joint. The whole point of skinning is to model this kind of effect. Now for the fun part: to actually see non rigid deformation, modify the weight attribute of the cylinder vertices, to linearly vary it from 0 to 1 over the whole cylinder/arm or just a subset of the arm at the vicinity of the joint. Observe carefully what happens as you play with the weights.
Exercise 3: Add a bone (optional)
level: hard
Add an additional joint and bone to the animation and adjust accordingly
the weight and bone index arrays to add a third set of non-zero bone weights.
The difficulty is to find the right Node hierarchy and transforms so that
the rotation center coincides with actual locus of the joint on the mesh.
The additional per-bone bone_offset matrices are intended for this purpose,
as they allow to pre-transform vertices of the bone in a coordinate frame where
the expression of the animation (here a rotation) is easier.
Application: Load a skinned mesh
The load() function provided in core.py can load a skinning
hierarchy from a file.
It will pass the bone_nodes and bone_offsets to Mesh.
The main function already has the code to detect whether
some animation files are given as command-line argument to the script
and load them. If you got Exercise 1 to work this code should run directly
with no problem.
You can download and use
some dinosaur animations or a
ninja animation to check this out.
Elements of solution
We provide a discussion about the exercises in Practical 7 - Elements of solution. Check your results against them.