Practical 2 - Meshes and modeling
After covering the basic mechanics of OpenGL and communicating with shaders, we now focus on the following goals:
understanding how to pass several primitives to the GPU
sending primitives with shared vertices in indexed mode
learning an easier abstraction to pass things to OpenGL
creating and drawing triangle meshes with their normals
drawing a basic canonical shape: cylinder
New files provided to download:
viewer.py
core.py
color.vert
color.frag
(We use the same color and vertex shaders from the solution given at the end of Practical 1 - First steps, with color and vertex position attributes).
Drawing indexed arrays
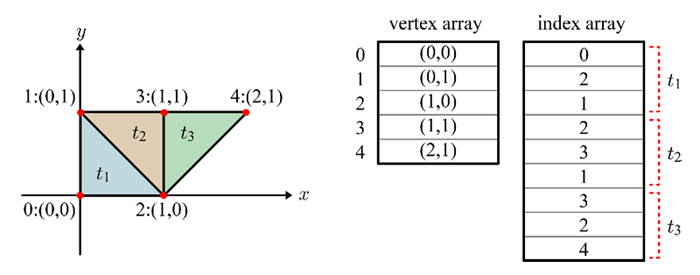
Until now we only drew one triangle primitive. To draw more complex surfaces, we need to understand how to pass several triangle primitives to the GPU. The main ways to send and draw a batch of primitives is to use indexed arrays, which we illustrate here for a set of 2D triangles:
Indexed vertex array
Indexed vertex arrays allow vertex sharing between triangles, by using two array buffers, one for vertex coordinates, and the second an index array, specifying where to get triangle vertices in the first, in groups of 3:
# one time initialization
position = np.array(((0, 0), (0, 1), (1, 0), (1, 1), (2, 1)), np.float32)
index = np.array((0, 2, 1, 2, 3, 1, 3, 2, 4), np.uint32)

glid = GL.glGenVertexArrays(1)    # create a vertex array OpenGL identifier
GL.glBindVertexArray(glid)        # make it active for receiving state below

buffers = [GL.glGenBuffers(1)]    # create one OpenGL buffer for our position attribute
GL.glEnableVertexAttribArray(0)   # assign state below to shader attribute layout = 0
GL.glBindBuffer(GL.GL_ARRAY_BUFFER, buffers[0])                   # our position buffer
GL.glBufferData(GL.GL_ARRAY_BUFFER, position, GL.GL_STATIC_DRAW)  # upload vertex data to it
GL.glVertexAttribPointer(0, 2, GL.GL_FLOAT, False, 0, None)       # each array unit is 2 floats
...                               # optionally add attribute buffers here, same nb of vertices

buffers += [GL.glGenBuffers(1)]                                        # new GPU index buffer
GL.glBindBuffer(GL.GL_ELEMENT_ARRAY_BUFFER, buffers[-1])               # bind it to receive
GL.glBufferData(GL.GL_ELEMENT_ARRAY_BUFFER, index, GL.GL_STATIC_DRAW)  # our index array here


# when drawing in the rendering loop: use glDrawElements for index buffer
GL.glBindVertexArray(glid)                                                # bind our vert array
GL.glDrawElements(GL.GL_TRIANGLES, index.size, GL.GL_UNSIGNED_INT, None)  # 9 verts => 3 tris
Note
The additional index array specified with GL_ELEMENT_ARRAY_BUFFER
is bound to the vertex array glid just like all vertex attributes.
Which means its state is also brought along when re-binding the vertex
array for drawing with the glBindVertexArray(glid) call.
There can be only one index array per OpenGL vertex array, obviously.
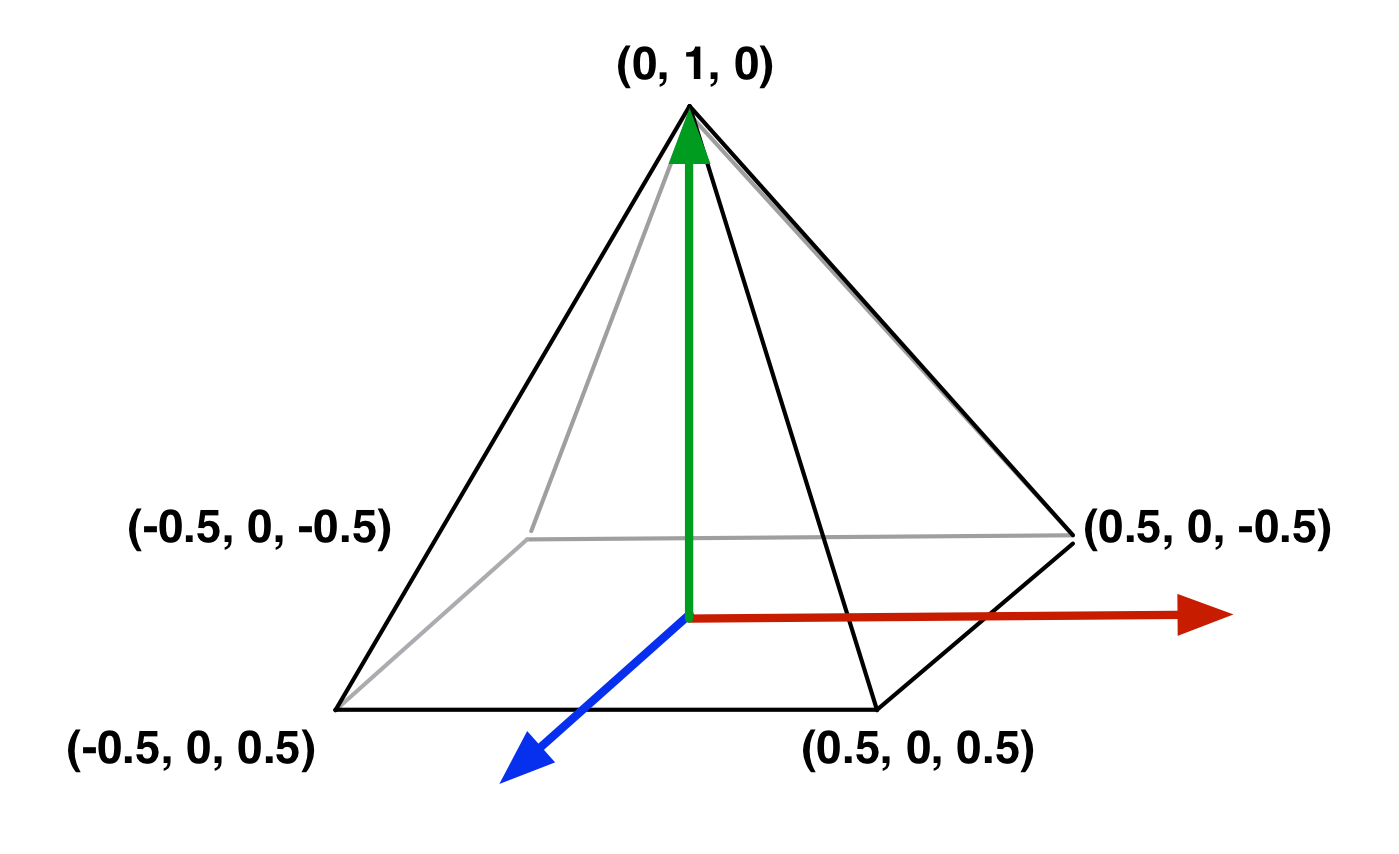
Exercise 1. Draw colored pyramids
Using the Pyramid class skeleton in the newly provided
viewer.py, draw a pyramid with different per-vertex colors and interpolated faces, as per the figure below. This viewer provides mouse control of the viewpoint, called a Trackball. You can also zoom with the mouse scroll button. Details of involved transforms will be discussed in Practical 3 - Hierarchical modeling. Note: if you have trouble with your own color shaders, you can download those of the practical 1’s Elements of solution.By convention for various tasks such as determining visibility, the vertices should be enumerated in counter-clockwise order when facing the surface. Uncomment
GL.glEnable(GL.GL_CULL_FACE)at Viewer initialization to enable back face culling, eliminating non-front facing polygons, to check the correctness of your orientation.At this stage, we intentionally never turned on Z-buffering. Observe and interpret what is going on. Then, turn on z-buffering by uncommenting
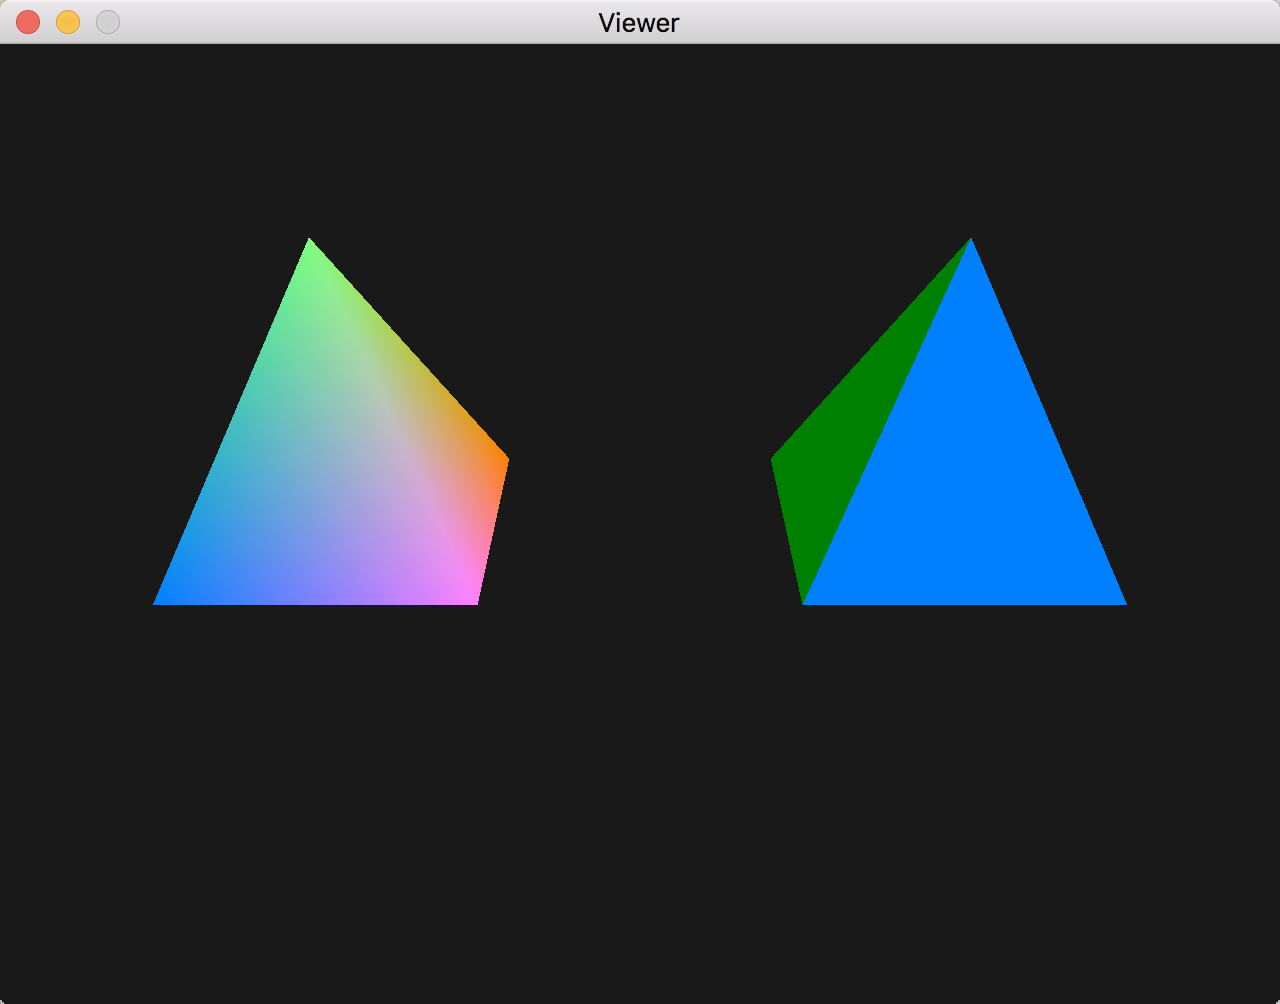
GL.glEnable(GL.GL_DEPTH_TEST)andGL.glClearcalls in the Viewer.What do you need to do to make faces of the Pyramid flat colored? Try to do that on at least one face to obtain a rendering similar to the right Pyramid in the figure below.
Pyramid coordinates. |
Interpolated and flat pyramid renderings. |
OpenGL mesh object abstraction
We’ve only created two object classes until now, and you’ve already copy-pasted the essentially identical uniform variable and attribute buffer creation code 3-4 times. Because of the low-level nature of the OpenGL API, and the error-prone repetition, every OpenGL programmer in the world ends up writing his own refactored wrapper code or using somebody else’s at some point.
We propose a core set of classes to manipulate the same concepts while making
things a lot easier. The main class you will need to appropriate is the
following Mesh class in file core.py
class Mesh:
    """ Basic mesh class, attributes and uniforms passed as arguments """
    def __init__(self, shader, attributes, uniforms=None, index=None):
        self.shader = shader
        self.uniforms = uniforms or dict()
        self.vertex_array = VertexArray(shader, attributes, index)

    def draw(self, primitives=GL.GL_TRIANGLES, **uniforms):
        GL.glUseProgram(self.shader.glid)
        self.shader.set_uniforms({**self.uniforms, **uniforms})
        self.vertex_array.execute(primitives)
The class constructor takes as arguments the shader used to draw the object, vertex attributes, uniforms, an optional index array as previously defined.
Vertex attributes and uniforms are passed as dictionaries, where the keys are the names of the variables in the shader, and the values are the values of the variables.
For vertex attributes, the values are numpy arrays which are used to create a Vertex Array object and the buffers on the GPU. This is encapsulated by the
VertexArrayclass. For uniforms, the values are stored for use at draw time.At draw time, the shader is activated and uniform variables passed to the shader. Run-time uniforms can be supplied with the **uniform keyword arguments to complement or replace the ones given at initialization. The pre-stored vertex array is then executed to draw the object geometry.
The
Meshclass can be used to create stand-alone objects, for instance creating a triangle directly inmain():position = np.array(((0, .5, 0), (-.5, -.5, 0), (.5, -.5, 0)), 'f') color = np.array(((1, 0, 0), (0, 1, 0), (0, 0, 1)), 'f') new_mesh = Mesh(shader, attributes=dict(position=position, color=color), uniforms=dict(global_color=(1, 1, 0))) viewer.add(new_mesh)
or it can be used to derive new objects and override the draw method if a specific behaviour is needed, for example our initial
Triangleclass can be rewritten as follows to change the global rendering color with a key press:class Triangle(Mesh): """Hello triangle object""" def __init__(self, shader): position = np.array(((0, .5, 0), (-.5, -.5, 0), (.5, -.5, 0)), 'f') color = np.array(((1, 0, 0), (0, 1, 0), (0, 0, 1)), 'f') self.color = (1, 1, 0) attributes = dict(position=position, color=color) super().__init__(shader, attributes=attributes) def draw(self, primitives=GL.GL_TRIANGLES, **uniforms): super().draw(primitives=primitives, global_color=self.color, **uniforms) def key_handler(self, key): if key == glfw.KEY_C: self.color = (0, 0, 0)
Exercise 2. Re-write your Pyramid class as Mesh derivative
Revisit your previous implementation of the Pyramid class such that it
inherits from the Mesh class. This will allow the Mesh class
to manage the buffers. Note that if we pass an index argument to the
Mesh class constructor, it will pass this argument to the
VertexArray, creating an indexed vertex array. This will select the
correct draw function (glDrawElements) when VertexArray.execute is called in
Mesh.draw.
Meshes and normals
The main representation for surfaces in 3D Graphics is a polygon mesh, which is primarily a set of vertices and their polygon connectivities. While general meshes can support polygons of any arity, OpenGL 4 supports triangle meshes only. As we have seen, they can be passed on to the GPU with vertex arrays or indexed vertex arrays.
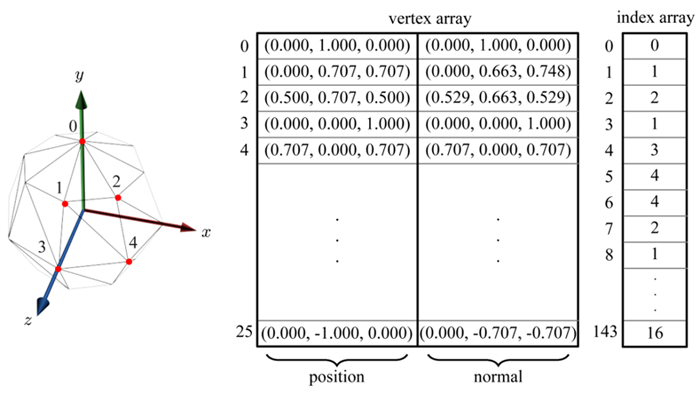
Among the various attributes that can be associated to mesh vertices, one stands out and is extensively used throughout the Graphics pipeline, notably for illumination: the surface normals. They indicate surface orientation by pointing outward with respect to the object. They must be of unit norm. Surface normals are typically specified either per-face, or per-vertex with normal interpolation on faces for perceived smoothness, as in this indexed array example:
Exercise 3. Loading models from files
There are many formats to store meshes. One of the most popular is the .obj format, which describes in text-readable format a succession of vertex positions, vertex normals, then face indices and face attributes. Here is a sample to use and look at:
We provide a simplified load function to load such a file in your viewer,
which you can copy-paste in your code. This simple load gives the intuition
of what happens in a load function (import a scene from a 3D file, and for each
mesh load its data and attributes.
It is based on the external module
AssimpCy, a Python wrapper of the assimp 3D asset importer library, and the
provided Mesh class:
import assimpcy                     # 3D resource loader
...

# -------------- 3D resource loader -----------------------------------------
def load(file, shader):
    """ load resources from file using assimp, return list of Mesh """
    try:
        pp = assimpcy.aiPostProcessSteps
        flags = pp.aiProcess_Triangulate | pp.aiProcess_GenSmoothNormals
        scene = assimpcy.aiImportFile(file, flags)
    except assimpcy.all.AssimpError as exception:
        print('ERROR loading', file + ': ', exception.args[0].decode())
        return []

    meshes = [Mesh(shader, attributes=dict(position=m.mVertices, color=m.mNormals),
                   index=m.mFaces)
              for m in scene.mMeshes]
    size = sum((mesh.mNumFaces for mesh in scene.mMeshes))
    print('Loaded %s\t(%d meshes, %d faces)' % (file, len(meshes), size))
    return meshes
We will do specific things later with normals, but for now we just use a
trick to visualize them, by passing the normals as color attribute in our
load() function and thus as colors for your color shader,
which should lead to the following visualization:
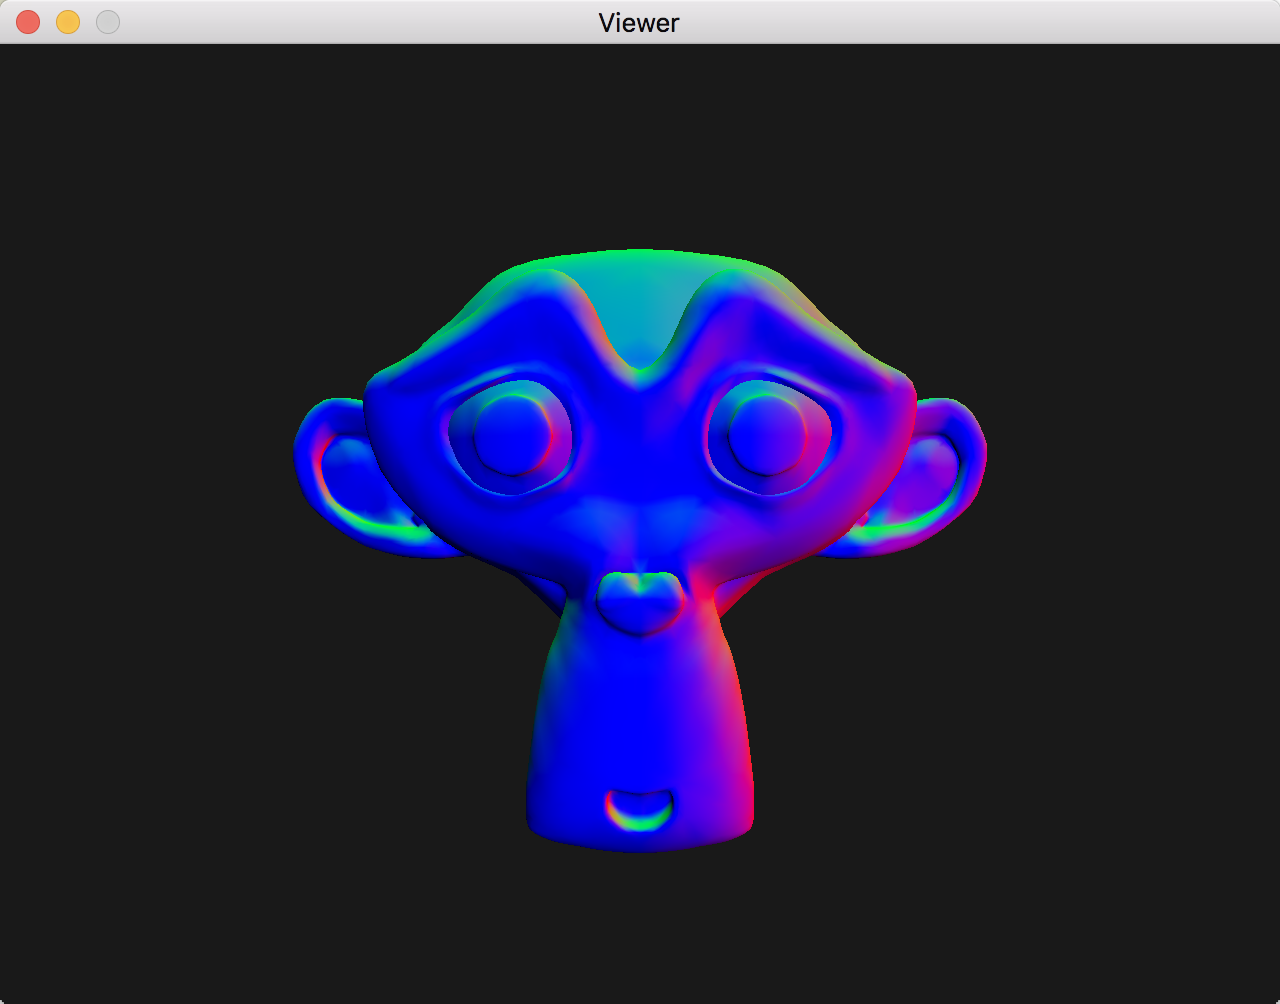
Expected rendering of suzanne.obj with interpolated normals rendered as color values
Note
Our loader function returns a list of meshes because resource files may
themselves contain several meshes - thus the for loop on scene.mMeshes.
So beware when you call load to pass the returned mesh list as argument
list to viewer.add, with the *, i.e.
viewer.add(*load('suzanne.obj', color_shader))
Optional Exercises
Exercise 4. Cylinder
Level: medium
To gain further intuition about meshes and normals it is of interest to build at least one canonical object by hand. The lateral surface of a unit cylinder can be described by the following parametric equations:
|
\[\begin{split}\left\lbrace\begin{array}{lcl}
x & = & \cos \theta \\
y & = & \sin \theta \\
z & = & h
\end{array}\right.
\qquad \mbox{for } \theta \in \left[0,2\pi\right[
\mbox{and } h\in\left[0, 1\right].\end{split}\]
|

Create a “canonical” cylinder centered along the z axis, with a radius of 1 and bases on \(h = 0\) and \(h = 1\), with a new Python class with the same layout as your pyramids. Don’t care about normals for now.
Discretize the lateral surface of the cylinder into quad facets, then triangles. The number of facets could be parametrized in the constructor.
Complete the geometry with the bottom and top bases. Ask yourself: how any vertices should be passed to the shader? Are they shared by multiple triangles?
For simplicity, use a translated version of the position as your color array
Add an instance of your new class to the viewer in
main()
Exercise 5. Cylinder normals
Level: medium
Add normals to your previous cylinder. Hint: it is fairly easy to get them from a modified version of the position array.
Use your color shader to display your normals; for appropriate visualization, try to pass a rectified version of the normals as your color buffer, such that normals are on a sphere centered on \((0.5, 0.5, 0.5)\) of radius 0.5.

Expected rendering of the cylinder with interpolated normals rendered as color values